
Roses are loved by gardeners all over the world. They have spawned several associations dedicated to their appreciation and huge gardens with the thousands of hybrids on the market today.
Despite their reputation for being troublesome, roses are no more difficult to care for than other perennials.
And as a bonus, they aren’t hard to distribute either.

Roses propagate by following the same steps as other woody plants, including hydrangeas and lavender. With a little attention to variety and proper care after trimming, you can grow a brand new rose bush for free.
Contents
when to propagate

Roses multiply in spring or early autumn. Opposing camps fight over the best time: before or after flowering. But as long as it’s neither too hot nor too cold, you should see results.
Before you start, keep in mind that a propagated rose can take several years to start producing flowers. They are also a bit more demanding than nursery-bought plants, depending on the type you choose.
But if you have a spare rose bush and some spare time, it can still be a fun and rewarding experience, producing a plethora of blooms after a few years.
Which roses are the best?
While all types of roses are propagated using the same method, some are easier to propagate than others.
Hybrid roses are usually grafted onto strong, stable rootstock to ensure strong growth. By cutting these plants, that stable base is gone, making it difficult to grow and maintain.
Hybrids are also more difficult to root due to their growing preoccupation and are less reliable propagation options.
In general, it is best to choose established rose varieties that have not been grafted. Look for plants labeled “bush roses” for the ideal propagation specimen.
How to propagate roses from cuttings.
clean your tools

To propagate roses you need sharp scissors and a pot. But before you start, it is essential to clean everything thoroughly.
A 5% bleach solution kills any harmful germs or bacteria on the scissors. This is especially important if you have recently used your shears or if the pot has been recycled, as they can spread disease to your new cutting or your original plant.
Also, make sure your scissors are as sharp as possible. It is difficult to make a clean cut with blunt scissors, which damages the stem and prevents scarring on the parent plant. Damaged stems are much less likely to regrow, can attract disease, and can develop health issues later.
prepare the ground

Roses are best propagated in specialist potting soil for roses to create the right conditions. If you can’t find rose-specific potting soil online or at your local nursery, you can also make your own potting soil by combining equal parts coconut fiber and river sand.
Coir holds more than 10 times its own weight in moisture and provides ideal conditions for root growth. River sand improves drainage in the pot, preventing the stem from rotting.
Coir is a sustainable alternative to peat, so you can use it if you have it on hand. Perlite also improves drainage and can be used as a substitute for river sand.
Mix the soil well and add it to a pot deep enough to accommodate the stem (at least 4 inches). Water and drain excess water from drainage holes before planting to prevent rooting hormone from being washed away later.
identify the stem

Then it’s time to choose the perfect rod. It should be green and healthy, with no signs of damage or disease. For fall propagation, stems that have just finished flowering are preferred, combining dieback and propagation.
The stem should also be at least 6 inches long, preferably 8, and it should have a few sets of leaves. From the base of the flower, measure 6 inches (15 cm) down past a node (the point where the leaves emerge).
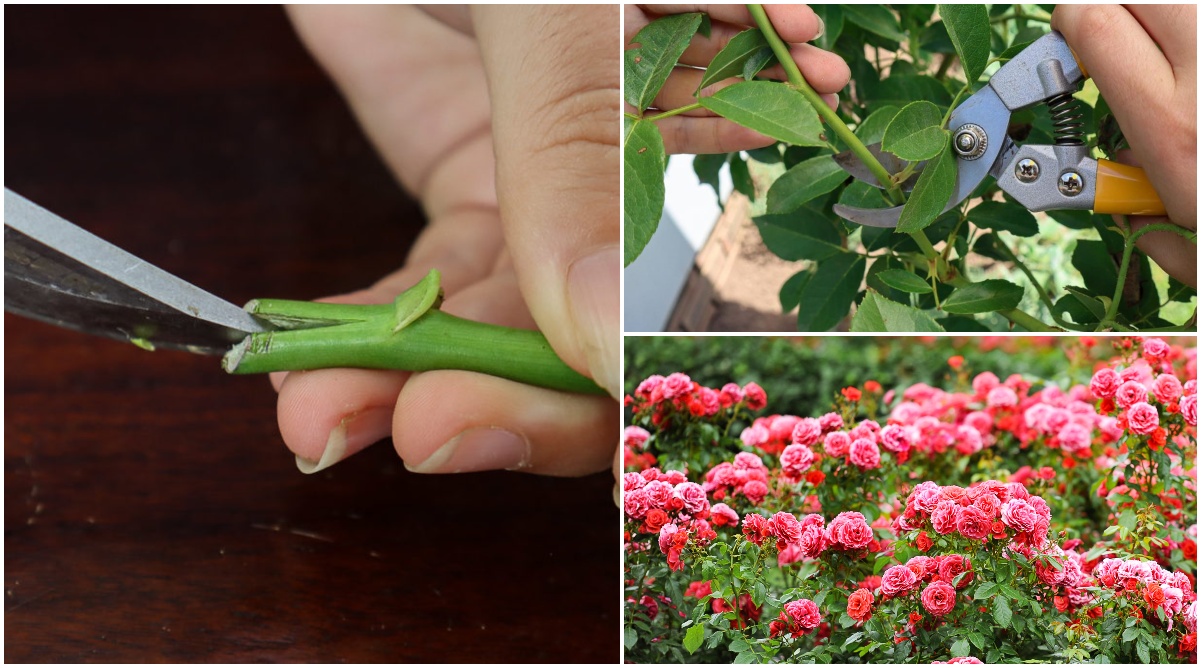
take cuttings
Take your sharp pruner and remove the stem from the plant. Cut at a 45° angle to increase the area under a knot. This is where root growth begins, so avoid cutting too close to avoid damage.
It is best to take the cuttings early in the morning when the roots are saturated. Avoid removing cuttings during the hottest hours of the day, as this is when the stems are deprived of moisture, dry out more quickly and limit their chances of rooting.
Remove the leaves and the flower.

Cut the flower from the top of the cutting. At the same time, remove all shoots along the stem. This will direct the plant’s energy towards root growth instead of flowering.
Then remove the lower sets of leaves along the stem, leaving only the upper set. The more leaves the cutting has, the more energy the plant needs to keep them alive.
Your final cut should have at least two leaves at the top and one or two visible knots at the bottom.
split rod

Take the bottom end of the cut and use your scissors or a sharp knife to carefully cut the end into wedges. This step is not absolutely necessary, but it will increase the amount of rooting hormone in the stem and increase your chances of success.
You can also make one or two small incisions in the outer layer of the stem instead of dividing the entire stem. You will need a steady hand to avoid damaging the knot above the cut as this will spoil any potential rooting opportunity.
Dive into Rooting Hormone

Rooting hormone is a powdery substance that stimulates root growth in cuttings and limits the risk of disease. Although not vital in the process, it greatly increases the chance of rooting, especially for hardwood cuttings that already have little chance of rooting.

Decant a small amount of powder into a separate container. This avoids any contamination of the original bottle. Dip the cut end into the water and then into the powder, completely covering all areas.
When you’re done, don’t put the remaining root powder back in the bottle, as it can spread disease. Instead, discard the excess.
Factory

Poke a hole with your finger or a pencil in the pre-moistened soil deep enough to bury half the cutting. Place the cutting in the planting hole and avoid touching the sides to retain maximum rooting hormone at the end.

Wrap the cutting well after planting to hold it in place.
plastic cap
Hardwood cuttings need a warm, moist environment to develop roots. To create the ideal conditions for root growth, you can create a mini greenhouse by covering your pot with a clear plastic bag.

Bury sticks or skewers in the sides of the jar to support the plastic. This prevents condensation from dripping onto the cutting and rotting it. Then place the plastic upside down on top of the jar so that it is completely covered.

Leave your pot in a warm place out of direct sunlight, as this can scorch the fragile new growth.
maintenance after planting

Continue to keep the soil moist by removing the plastic bag and sprinkling or watering regularly. When changing the bag, make sure there is enough air in it to prevent stem rot.
Root growth takes two to three weeks. If no new green growth is present, you can gently tug on the cutting to determine if roots have developed.
Once the roots have reached about an inch or two in length, or if you notice new leaves forming on the stem, you can transplant the rose into the garden. Expose it to outdoor conditions a few hours a day before planting to acclimate it and limit the impact.
If your outreach efforts fail, don’t worry. Root growth is not guaranteed and it may take several tries to be successful. Give them the right conditions, watch the humidity levels, and you should see root growth soon enough.