Propagating roses (Rosa) from cuttings (stems) is easy, but what if you could make it easier? You can do this using something found in your bathroom: toilet paper! Yes, you read that right ! If you want fast and guaranteed rose propagation, learn how to propagate roses from cuttings using toilet paper.

The usefulness of using toilet paper to propagate roses
When growing roses from cuttings, humidity plays a key role in root development.
Toilet paper traps moisture at the bottom of the stem, keeping it very evenly moist, increasing the chances of successful propagation.
You can do it from spring to early fall for best results, but if you’re doing it indoors where the temperature is above 10 degrees Celsius, you can also try it in the winter.
Propagate Roses From Cuttings Using Toilet Paper Step by Step
1. Get healthy cuttings

For this technique to work perfectly, you must start with healthy young cuttings. Cut the stems 15 to 20 cm long from a leafy plant using sharp, sanitized shears.
Tip: Semi-hard cuttings are easy to root and give the best results.
2. Cut the leaves

Remove the leaves from the stems so that all of the plant’s energy is directed towards growing new roots.
If you prefer, you can leave two or three leaves at the top of the stem, but cut them in half to avoid stress.
3. Cut both ends

Cut both ends of each stem, but the bottom cut should be at a 45° angle.
This will greatly increase the chances of propagation as roots can form more easily.
4. Wrap the stems in toilet paper
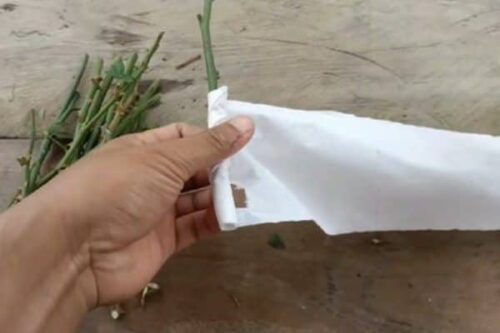
Dip the end to be coated in rooting hormone (optional) and wrap the stems in 3-4 layers of toilet paper. Don’t roll them too much and don’t cover them more than halfway, as this will hinder the air supply.
You can also use paper towels, old black and white newspapers, or any other paper that rots easily for this purpose.
5. Wet evenly
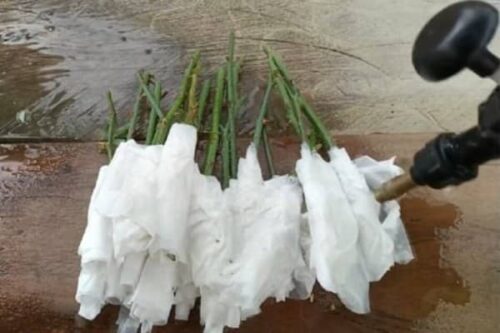
Once all the rods are wrapped, spray water on the toilet paper until it is completely soaked. Squeeze out excess water. Also watch out for thorns when handling the stems.
6. Prepare a casserole

Take a medium-sized pot and fill it with any well-drained potting soil. You can make it by mixing equal parts garden soil, compost and river sand.
Don’t fill it completely just yet, just fill the bottom quarter with the growing medium.
7. Place the cuttings

Now place all the cuttings in the pot as shown in the previous image. Do not introduce them into the culture medium. Also, be sure not to damage the toilet paper.
Then, cover the cuttings with soil up to 50-75% of their height. Remember not to completely cover or bury the cuttings in the growing medium; the floor should only cover the toilet paper.

Once done, spray the growing medium and the cuttings evenly with water until the water runs out of the drainage holes in the pot.
8. Let them grow

Place the pot in a place where it gets a lot of bright, indirect light, direct sun is not good when the cuttings start to develop roots, they may get some sun, but during the day it is not very strong.
Water regularly to keep the soil slightly moist, but try not to over-soak as this can cause problems for small roots.
9. Check Growth
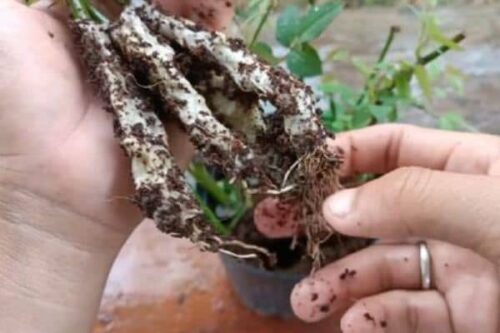
After 2-4 weeks you will see new leaves sprouting, this is the time to carefully remove the cutting from the pot and examine for signs of root growth. If you still don’t see roots, put the cutting back in the ground and wait a few more days.
Once they have formed, you can plant the cuttings in pots or in your garden in full sun, and they will soon develop into flowering plants filled with beautiful, fragrant pink flowers.
On the other hand, if you prefer, you can plant the cuttings in individual pots to avoid having to transplant, just let the paper fall apart on its own in the soil.
Related Items:
Share it on the networks: