
Sure, kombucha is available at most stores, but some of us prefer to make our own fermented drinks. To make kombucha, you’ll need to start with a SCOBY, which stands for “symbiotic culture of bacteria and yeast.”
It is an essential ingredient responsible for making your drink sparkling. Also known as the “mother,” this layer of bacteria and yeast is what makes kombucha, kombucha.
Here’s everything you need to know about making your first SCOBY and the different ways to use it.
Where does SCOBY come from?
It is easy to recognize a SCOBY. It’s a flat, round, rubbery substance that almost looks like a gelatinous pancake. The scoby is also called a mushroom, but it is not a mushroom.
Typically, you’ll see SCOBY layers floating atop the kombucha. The gelatinous texture is crucial for the kombucha fermentation process.
Kombucha originated in China and was first recorded 2,000 years ago. The name kombucha comes from the Japanese for tea (cha) and kelp (kombu), although we don’t use kelp to make it.

The sweet and sour taste is a unique feature of this drink. The bacteria involved in the creation of the SCOBY are usually those from the Acetobacteraceae family. If other bacteria get in, they can destroy the culture.
SCOBY is made up of lactic acid bacteria (LAB), acetic acid bacteria (AAB) and yeast. At maturity, it is an active yeast culture that gives this sparkling texture. If you’ve ever made sourdough, it’s like a starter.
It constantly renews itself, which is why you might find a small saucer of SCOBYs growing inside a bottle of unflavored kombucha.
There are two ways to create a SCOBY. The easiest method is to buy some store-bought kombucha and use it to feed a new SCOBY. The downside to buying kombucha from the store is that it often contains additives or yeast inhibitors.
Kombucha with additives can take a long time to develop, if it develops at all, and the quality is poor. So read the label carefully before taking your starter kombucha.
You need natural, organic, chemical-free, and unpasteurized kombucha to start a new SCOBY.
Alternatively, you can make a SCOBY from a batch of mother kombucha, whether you use a friend’s or buy dried or fresh.
Is a SCOBY needed to make Kombucha?
Another way to think of a SCOBY is as a protective layer for kombucha liquid. The thickness and gelatinous texture prevent harmful bacteria from entering the drink. SCOBY also prevents dirt from getting past the top layer.
But that’s not SCOBY’s purpose. It creates the sour vinegar flavor and the fizziness that makes kombucha so unique.
Here’s how to make SCOBY from an existing kombucha supply.
How to Make a SCOBY from Kombucha

As mentioned, SCOBY is a natural result of the kombucha brewing process. To start a new SCOBY, you can grow it from an existing batch of kombucha.
The main ingredients to make a SCOBY are:
Look for a tea like oolong, black or green tea. The tea should not contain oil or flavorings, as this will interfere with the fermentation process. Do not use honey for your sugar and remember that your kombucha should be preservative free.
Gather a saucepan, spoon, sterilized glass jars with lids, a cloth and a rubber band.
Make the tea
Add seven cups of water to a pot and let it boil. Remove from the heat and stir in half a cup of sugar and stir until the sugar dissolves completely. Add four bags or four tablespoons of loose tea.
Let the tea steep in a cool place. Remove the bags or foils once the liquid has cooled.
Mix tea and Kombucha
Take your tea and mix it with a cup of liquid kombucha. If your store-bought kombucha has a baby SCOBY on top, pour it into the jar. Store the mixture in a jar that has room for expansion.
Mason jars are ideal for storing the SCOBY. Do not close the jar completely. Cover the jar with a cloth, coffee filters, or something breathable so the scoby can breathe while keeping the critters out. Secure it with a rubber band.
Place a blanket and keep it for four weeks
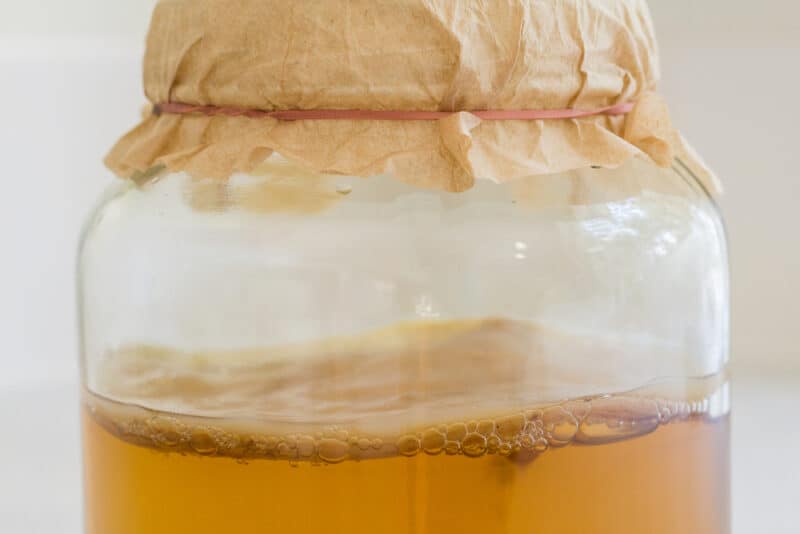
Place the jars in a cool, dark place out of direct sunlight and leave them for up to four weeks.
Sometimes the fermentation process will be faster than four weeks, but you should plan for this time just in case. As long as the SCOBY is protected from direct sunlight and heat or freezing temperatures, it should start growing within a month.
Sign that your SCOBY is ready
Once the SCOBY begins to form, it is difficult to determine when it has matured. Experienced kombucha brewers know consistency and texture, but beginners should take their time studying their first SCOBY.
The thickness of the SCOBY is a good sign; it should be at least a quarter inch thick and opaque. This means that it should have a cloudy appearance and a dense texture. Think jelly but without transparency.
Another obvious sign that the SCOBY is ready is if there are bubbles and strings. A healthy SCOBY has bubbles on the surface and string-like strands coming from the bottom.
When you smell the SCOBY, it should have a strong vinegar smell. Take the jar and sniff it. If you don’t feel anything, it takes a little longer.
Bad signs to watch out for
Under no circumstances should your SCOBY be black or tight. It’s frustrating if you discover mold halfway through the growing process, but you have to throw away the black SCOBY.
If your SCOBY discolors, go back and re-read the steps to make sure you followed everything correctly. A contaminated jar can harbor bad bacteria. Or maybe you didn’t seal the jar well and gnats or something got in.
Cheesy or rotting smells also indicate that the SCOBY has gone bad. You will be able to quickly tell if this is the case and throw the stuff away.
It may take a few batches of trial and error before you get the right SCOBY, so don’t give up! Once you have SCOBY, head over to our guide to making kombucha.
Should you throw away SCOBY?

Once you land a SCOBY on your kombucha, you’ll use it to create new drinks. But sometimes you should cut some SCOBY to help refresh it. What do you do with the cut pieces? Just throw them away?
There are many ways to get the most out of this substance. Although it may not look appetizing, it has nutritional benefits that can improve your plants and your skin.
A simple way to use SCOBY is to eat it like jerky. Cut the SCOBY into thin slices and flavor it with spices like paprika or pepper. Dry the SCOBY strips on a piece of parchment paper and cover it overnight.
Then toss the jerky into a salad or eat it as a healthy snack while you garden.
SCOBY is also perfect for making nourishing skincare products like a mask. Add honey or charcoal to the SCOBY for a deep cleansing face mask.
Or, top the SCOBY with other ingredients of your choice, like yogurt, honey, and lavender. Blend it into a smooth paste. SCOBY can also be included in a body scrub.
The last useful use of SCOBY is to add to your garden soil. Putting the SCOBY directly in the compost or near the base of your plant will increase nutrients. Remember to cover the SCOBY with soil so it doesn’t attract pests or wildlife.
There are lots of ways to use SCOBY, so start creating your own batch and experiment with some of these ideas when you’re done!
Was this article helpful?
Yes No ×
We appreciate your helpful feedback!
Your response will be used to improve our content. The more feedback you give us, the better our pages will be.
Facebook pinterest